 |
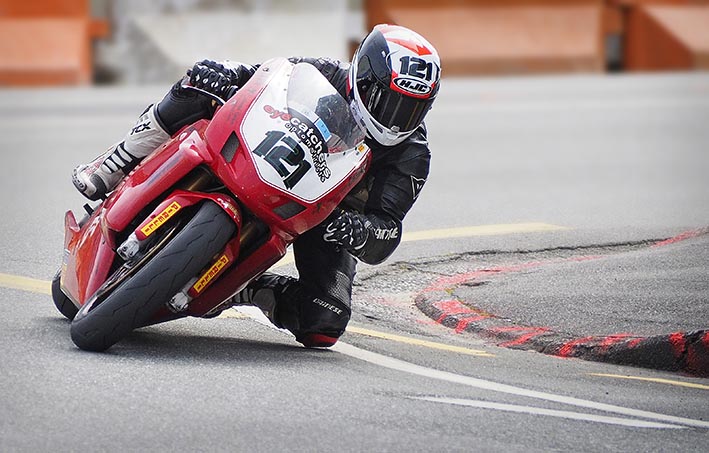
| In the Lead. OM-D E-M5 MkII with 40-150mm f4/5.6 lens. 1/4000th sec @ f5.6, ISO 1600 |
As I said, I was thrilled with the quality of the images I
captured – especially with the ‘cheap’ Olympus 40-150mm f4/5.6 consumer zoom.
Cheap and plasticky it may be, but boy-oh-boy is it one sharp lens for the
price. Even wide open, it’s as sharp, if not even sharper, than the Canon 400mm f5.6 and 70-200mm f2.8 pro zooms. And
that’s not just anecdotal. That’s from actually comparing images taken with
these lenses from previous years capturing the same event.
 |
| Cutting it Close. Olympus E-M5 MkII with 40-150mm f4/5.6 lens. 1/2000th sec @ f5.4, ISO 800 |
Yet as sharp as it may be, the one slightly limiting factor
for the lens, and to a certain extent mirrorless itself, is the larger
depth-of-field exhibited due to the smaller sensor size. F5.6 on the EM-5 MkII
is equivalent to F11 on a full frame sensor (and probably around f8 on an APS-C
sized DLSR). This is great for landscapes when you want everything in focus.
Not so great for sports where you want a decent separation from the action and
the background.
So, with the editing of the images, I set out to give more
background blur, for a greater 3D quality and subject ‘pop’. I also wanted to
simplify the backgrounds as much as possible, to really focus attention on the
bikes themselves. I had tried to achieve this on the day by positioning myself
somewhere on the track with fairly clean backgrounds. But even then, I wanted
to make it cleaner still by cloning out a few problem areas.
 |
| Catch Me If You Can. E-M5 MkII with 40-150mm f4/5.6 lens. 1/2000th @ f5.6. ISO 640 |
 |
| Complete Concentration. E-M5 MkII with 40-150mm f4/5.6. 1/2000th @ f5.6. ISO 1000 |
Second step was actually sharpening. Yes, the images were
already sharp, but I wanted to give them even more crispy sharpness. I achieved
this with ‘high pass’ sharpening (my favourite way to sharpen), and then added
a layer mask to mask out the areas I didn’t want sharp (like the asphalt on the
road and the background).
Third step, cloning out the unwanted distractions. Cropping
got rid of some of them, but many of the plastic barriers had dark holes and
branding on them that were very distracting – even out of focus. So I cloned
them out using a combination of 'content aware' fill and the clone brush.
 |
| Layers Palete in Photoshop for Blur |
Having achieved all that, I was then ready to create the
background separation. I wanted the final images to look like they were shot
with an f2.8 aperture rather than the f5.6 (f11) they were actually taken with.
To do this, I cut around the bike and rider using the pen tool (make sure you
use a good graphics tablet if you’re going to be doing a lot of pen tool work)
and selected this with a 0.5 feather on the selection. I pasted this on a new
layer (Ctrl + J), and then went back to the original layer and duplicated this
as well (Ctrl + J again). I re-selected the selection (found in the Path
palate), this time with no feather, and hit Delete (Backspace) on the keyboard
to cut it out of the layer. To this layer I applied a 15% Gaussian Blur, then
added a layer mask. Using the gradient tool I masked out the lower third of the
image, graduating towards the top where I wanted the most blur. And hey-presto,
an f2.8 background!
This is the most time-consuming element to the image, but
still only took me about 10 minutes to achieve. And I’m more than happy with
the results. I wanted the bikes to really ‘pop’ out from the background,
without making it look too unnatural. Hopefully I’ve achieved that?
 |
| All the changes made in post process to get the images looking how I wanted. |
To finish it all off, I flatten the layers into one final
image, and then darkened the top and bottom a little, before adding a 10% black
feathered vignette to the image. Subtle, but just something to again help draw
the eye to the action in the image.
It sounds like a lot, bit it really isn't when you sit down and get into the flow of processing. Each image probably took about 15 minutes, and it certainly helps if you have a good graphics tablet (Wacom Intuos).
 |
| And the finished image after all that processing. |
Admittedly, I could have saved myself a few hours of post processing work by just shooting with an f2.8 lens in the first place. Agreed. Except, I don't have an f2.8 150mm lens on me, and am probably never likely to. So you make do with what you have, and just know you're up for some computer work afterwards. I don't think that 10 to 15 minutes is overly excessive in terms of post production anyway. I certainly wouldn't want to spend that time working on every shot I take - and I don't. My average is probably only a minute or two. But for images that I want to take the time to elevate to a higher standard, then 10 minutes is totally worth it (IMHO).
 |
| Out in Front. E-M5 MkII with 40-150mm f4/5.6 lens. 1/4000th sec @ f5.6. ISO 2000 |
There may be some photographers out there who still believe any use of Photoshop in an image is a crutch. Hard to believe maybe, but I'm old enough to remember back to Photoshop version 1 and the hot debates held by 'purist' photographers and those crazy early digital adopters. For a long time, Photoshop was a dirty word in camera club circles and while that may have changed, I know that many photographers still believe that you shouldn't spend longer than 1 minute 'working' on a photo on the computer.
I can sympathise. But sometimes, I also think that you've gotta do what you gotta do to help create your vision. You can't use Photoshop to make a silk purse out of a sow's ear, but you can (and should) use Photoshop to help you achieve the end result you envisaged when you took the photo. And that's exactly what I've done with the images in this post. Hope you like them?